Think Bigger From Filmora User Guide
-
Preparations for Mac
-
Account (Mac)
-
Get Started & Basic Settings (Mac)
- Release notes for Mac
- Latest Versions and Features for Mac: V14
- Get Started on Mac - Full Guide
- Download/register/uninstall on Mac
- Panel Layout on Mac
- Keyboard shortcuts on Mac
- Touchbar on Mac
- Change playback quality on Mac
- Render preview files on Mac
- Manage timeline on Mac
- Media for use on Mac
- Logo Reveal For Mac
- Marked Favorites for Mac
-
Compatibility & Tech Specs (Mac)
-
Performance Settings (Mac)
-
-
Creating Projects - Mac
-
Creating New Projects (Mac)
-
-
Importing & Recording - Mac
-
Importing (Mac)
-
Recording (Mac)
-
-
Video Editing for Mac
-
Basic Video Editing for Mac
- Edit Live Photos on Mac
- Enable/Disable Clip for Mac
- Magnetic Timeline For Mac
- Select All Clips on Timeline for Mac
- Auto Ripple for Mac
- Split & cut videos on Mac
- Compositing on Mac
- Crop and zoom on Mac
- Playback Zoom Level for Mac
- Change speed on Mac
- Play video in reverse on Mac
- Mark In and Mark Out for Mac
- Markers for Mac
- Group clips on Mac
- Customized Backgrounds for Videos and Images in Mac
- Video snapshot on Mac
- Freeze frame on Mac
- Auto enhance on Mac
- Applying Drop Shadow for Mac
- Adjustment Layer for Mac
- Mark clip on Mac
- Video Editing Ruler – Mac
- Apply Transforming for Mac
-
Advanced Video Editing for Mac
-
AI-Powered Video Editing for Mac
- Smart Scene Cut for Mac
- Smart Short Clips for Mac
- Image to Video for Mac
- AI Text-to-Video for Mac
- Instant Cutter Tool on Mac
- AI Face Mosaic for Mac
- Keyframe Path Curve for Mac
- Planar Tracking for Mac
- AI Text-Based Editing in Mac
- Create With Instant Mode on Mac
- ChatGPT Plugin - AI Copywriting on Mac
- AI smart cutout for Mac
- Auto reframe on Mac
- Lens correction on Mac
- AI Portrait Cutout on Mac
- Scene detection on Mac
- AI Smart Masking for Mac
- AI Mate Editing for Mac
- Motion Tracking on Mac
- Stabilize video on Mac
- AI Object Remover For Mac
- AI Smart Search for Mac
- AI Skin Tone Protection for Mac
- Green screen on Mac
- Super Slow Motion with Optical Flow for Mac
- AI stylizer on Mac
- Video Denoise for Mac
-
-
Audio Editing for Mac
-
Basic Audio Editing for Mac
-
Advanced Audio Editing for Mac
-
AI-Powered Audio Editing for Mac
- Audio To Video for Mac
- AI Sound Effect for Mac
- Smart BGM Generation for Mac
- AI Voice Enhancer for Mac
- Audio Stretch for Mac
- AI Audio Denoise for Mac
- Auto synchronization for Mac
- AI Vocal Remover for Mac
- Auto Beat Sync on Mac
- AI Music Generator for Mac
- How to Perform AI Voice Cloning in Wondershare Filmora?
- Silence detection on Mac
-
-
Text Editing for Mac
-
Basic Text Editing for Mac
-
Advanced Text Editing for Mac
-
AI-Powered Text Editing for Mac
-
-
Video Customizations for Mac
-
Video Effects (Mac)
-
Audio Effects (Mac)
-
Transitions (Mac)
-
Stickers (Mac)
-
Filters (Mac)
-
Color Editing (Mac)
-
Animations (Mac)
-
Templates (Mac)
-
Asset Center (Mac)
-
-
Exporting & Share & Cloud Backup - Mac
Manage Timeline
The timeline is where the majority of the video editing process takes place. So, in this tutorial, we are going to learn how to add, adjust, lock and hide video and audio tracks in Filmora timeline panel.
Using the timeline
The Playhead is an indicator that shows you where on the timeline you are currently located and allows you to move through the media files you placed on the timeline. The frame at which the Playhead is positioned is going to be displayed in the Preview window.

Adjust Timeline View
As you hover over the area of the timeline that shows time with your mouse, the pointer is going to change into a two-way arrow. Move the mouse either to the left or the to the right while holding the left-click to zoom in or to zoom out of the timeline.

The Zoom to Fit the Timeline icon is located in the upper right corner of the timeline. Clicking on this icon will enable you to see all the media you’ve added to the timeline within a screen. Alternatively, you can use the zoom slider if you want to adjust the zoom level manually.
Managing Tracks
A track is the part of the timeline where all the media is located. Tracks in Filmora can either hold video or audio files, and you should keep in mind that audio and video clips can never be on the same track.
Add One Track Each Time
In order to create and add a new track you just have to drag and drop audio or video file to a preferred location. Filmora will automatically create a new track for the elements dragged to timeline.

Add multiple tracks at the same time
Click the Manage Tracks icon located in the upper left corner of the panel and a drop-down menu that lets you add new audio and video tracks or delete a track is going to appear on the screen.

Click the Open Track Manager option and then you can add up to 99 video and audio tracks to a project from the Track Manager window. Moreover, the Placement drop-down menu lets you choose how the tracks are arranged.

If you right-click on the section of the timeline below the Manage Tracks icon where the information about tracks is displayed you can access each of these options from the right-click drop-down menu.
Under the Manage Tracks menu, you can increase or decrease the size of the tracks from the Adjust Track Height submenu.
Hide & Lock Timeline
You can click on the Toggle Track Output icon that looks like an eye on a particular track if you want the media invisible. The Toggle Track Output option is depicted as the sound icon on audio tracks and it enables you to mute an entire track.

The lock icon lets you lock all media on a track. Once you look a track, you will not be able to edit, move or change the media files you added to that track.
Organizing the timeline with markers
The Add Marker icon is located in the upper right corner of the timeline and after you click on it, a new marker will be added to the same location on the timeline where you placed the playhead.

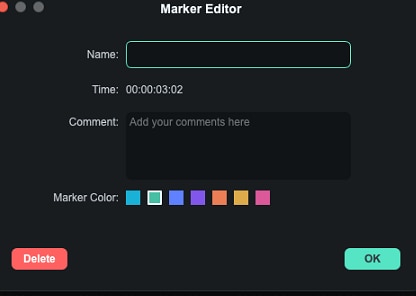
Double-click on the marker you created if you want to gain access to the Marker Editor window where you can change the name or the color of the marker or add a comment.
If you would like to add a marker to a video clip you just have to make sure that the clip is selected and click on the Add Marker icon. Creating notes can be useful when working on large projects because you can use them to line up different types of media assets.

Related Posts
Featured Articles
How to Add Captions and Subtitles to Videos in Canva (Manual & Auto Methods)
Need subtitles for your video but don’t want to type them manually? Try Canva captions or explore advanced auto-captioning tools. It's an easy and time-saving way to add captions to your videos.
How to Convert Landscape Video to Portrait (PC & Mobile) 📱💻
Do you want to know how to turn a landscape video into a portrait? Read this article to discover some of the easiest ways to do it without compromising quality.
Editing Sounds Like a Pro – 10 Best Audio Editors for Mac
Looking for a music editor for Mac? Check out our detailed review of the 10 best audio editing software for Mac this year and find one that best suits your needs.
Recommended User Guide
Marked Favorites for Mac
Wondershare Filmora has made adding effects or filters easy for users through its Marked Favorites feature.
Latest Versions and Features for Mac: V14
Find out the new features of Filmora Version 14 for Mac.
Logo Reveal For Mac
Do you want to animate your brand's logo to look professional? Learn how Wondershare Filmora helps in creating the perfect logo reveal animation.
